You guys know that I love a good grazing platter, but even more I love BUILDING a good grazing platter. Since the holiday season is approaching, if you're curious to learn step-by-step how I build my platters, then keep on reading because I'm about to show you EXACTLY how I do it in 7 Steps! 😍
What You'll Need:
- A good sized board
- Small bowls and/or plates
- Fruits that have different colours
- Dips
- Olives
- Cheese (at least 3-4 types of cheeses)
- Cold Meats of different shapes, sizes, colour variations
- Biscuits/Crackers/Bread Sticks
- Small fruits, nuts, grapes, dates, dried fruit, etc. Anything that will help fill gaps to make the platter look fuller!

Step 1: Choose Your Board & Small Bowls
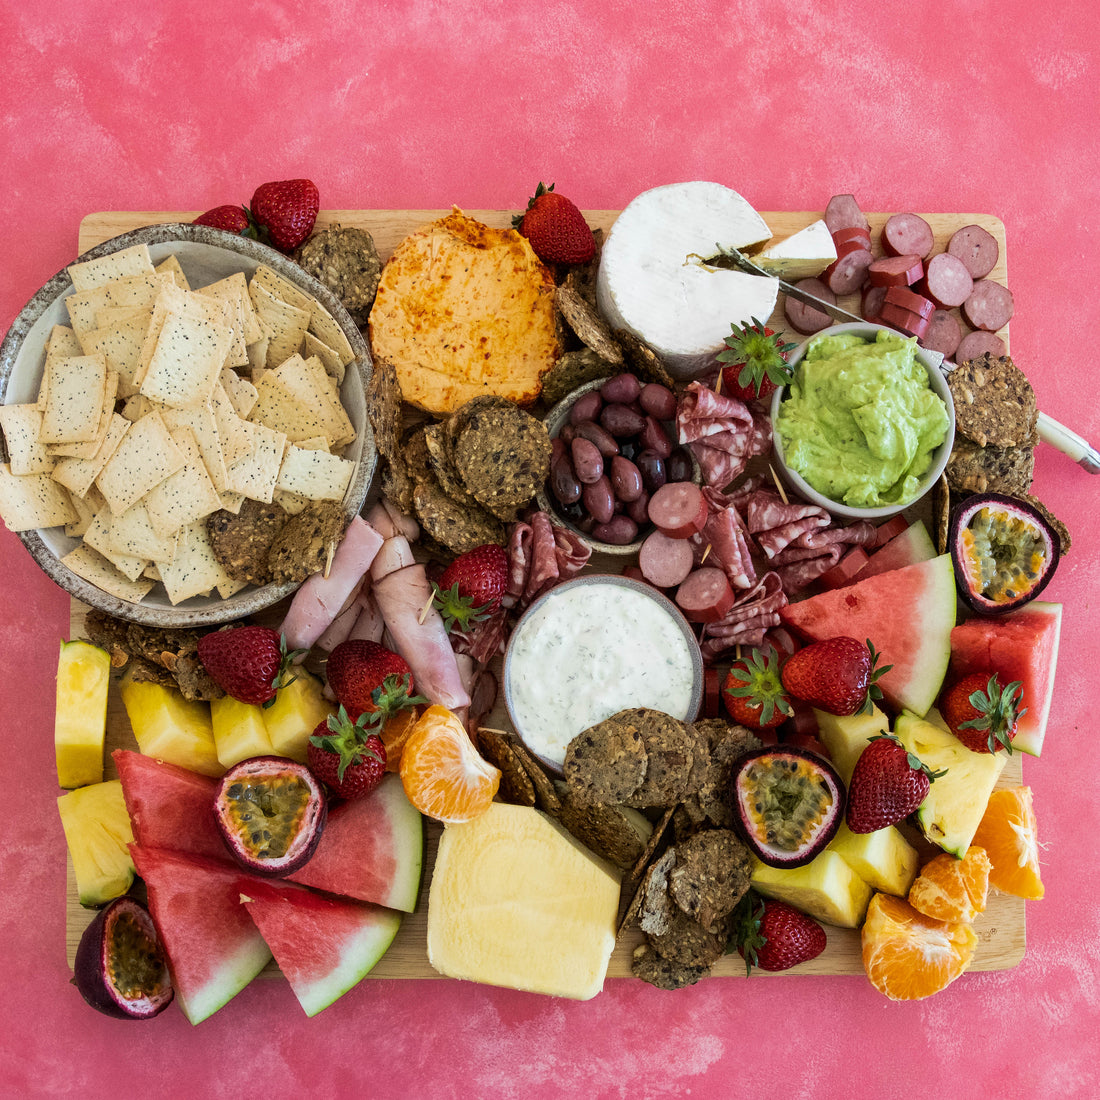
You first need a large board - wooden is my favourite! I always use plates or bowls on top of my board to give it height and a little extra fancy-ness. Set them where you want them and get ready to build around them!

Step 2: Add Your Fruit
Cut up your fruit into single-serve chunks/slices and place them at either end of your board. Doing this will help you to frame your board and give some really great colour to the whole board!

Step 3: Add Dips & Olives
You want to find dips with the most colour, but also dips that will be most popular for your guests! For example, I like to use guacamole and tzatizki in my household since they are always a HUGE hit. And olives... a DEFINITE must. Sometimes I even get different types, some green, some black, some marinated. Depends what you think your guests will love!

Step 4: Add Your Cheeses
Make sure you choose at least 3-4 cheeses for some variety in taste, texture AND appearance! For something a little extra fancy, I like to cut into mine (see the Brie!) to make it look a little more rustic. It also invites guests to cut into a cheese themselves, rather than holding onto that little inner-fear at the beginning of 'cutting the first slice' of a fresh board!

Step 5: Add Your Cold Meats
I always like to go with Salami, Ham and Kabana as a base, and then if you're wanting a little more, you could do some Smoked Salmon, Prosciutto, etc. I always tell the person at the deli that I'd like the slices thin BUT also that they're for a grazing platter so I need to be able to roll them and have them not fall apart! They will usually always know how to slice it perfectly 😊 Once you've taken them home, you can keep the slices whole or cut them in half.. you can roll them, fold them, twist them.. any shape that you like that is easy for people to grab!

Step 6: Add Your Crackers
Put your biscuits/crackers/bread sticks into bowls and in any spots that you can see the bottom of the board. The aim here is to fill in some of those gaps! If you're placing them on the board, you can get creative on how you want them to look as well! You can pile them up, fan them out in a straight line or even a curved line.. anything you like!

Step 7: Add Your Fillers
Anything small and easy to scatter around will be your most helpful fillers at this point! Strawberries and passionfruit halves are my go-to favourite fillers because of how bright and cheerful they look! But you can seriously use anything as fillers! Whatever you choose as your fillers, start filling in those last few gaps with them!

And there you have it! Your VERY OWN grazing board in 7 simple steps! 🎉
Can't wait to see how you get down with your grazing boards! Every creation has their own flair and look about them.. which is what makes them all so unique and so amazing!
Happy grazing!
Leah xx
